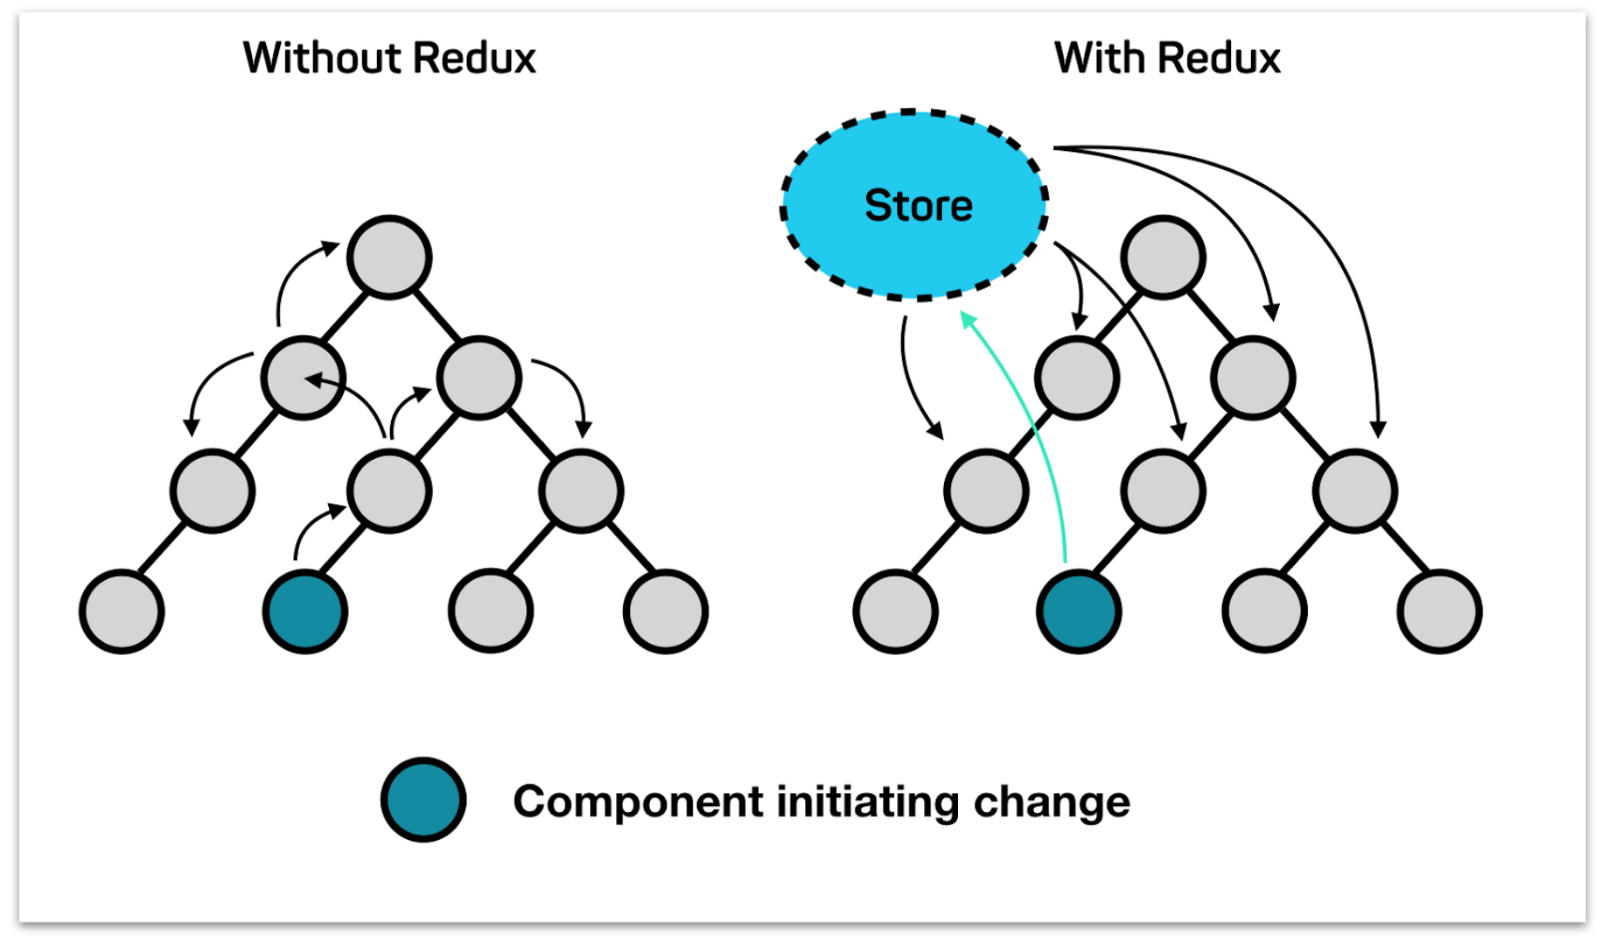
react만 사용해도 애플리케이션을 개발할 수 있다. 하지만, 규모가 커지고 구조가 복잡해질수록 컴포넌트의 상태(state) prop으로 넘겨주고 관리하는 일이 귀찮아진다. 리액트로 상태를 관리하면 부모 자식 관계처럼 위에서 아래로 또는 아래에서 위로 상태(state)를 props로 넘겨주어야 한다. 하지만 아래 그림과 같이 redux를 사용하게 되면 위아래로 상태 값을 넘겨주지 않고도 상태 값들을 저장하고 받아올 수 있다.
![]()
출처
install
- redux와 react와 연결해 줄 react-redux를 설치한다.
1
| npm i reduxt react-redux redux-logger
|
src/reducers/index.js -> root store- index 파일에
combineReducers로 reducer를 하나로 모아준다.
1
2
3
4
5
6
7
8
9
10
11
| import { combineReducers } from 'redux'; // 흩어진 reducer 들을 하나로 모아준다.
import user from './user';
import post from './post';
const rootReducer = combineReducers({
user,
post,
});
export default rootReducer;
|
action
1
2
3
4
5
6
7
8
9
10
11
12
13
14
15
16
17
| import * as type from './types';
export const loginAcion = (userData) => {
return {
type: type.LOGIN_USER,
userData,
isLoggedIn: true
};
};
export const logoutAction = () => {
return {
type: type.LOGOUT_USER,
userData: {},
isLoggedIn: false
};
};
|
type
1
2
| export const LOGIN_USER = 'LOGIN_USER'; // 액션의 이름
export const LOGOUT_USER = 'LOGOUT_USER';
|
reducer
1
2
3
4
5
6
7
8
9
10
11
12
13
14
15
16
17
18
19
20
21
22
23
24
25
26
27
| import * as type from '../actions/types';
const initialState = {
user: {},
isLoggedIn: false
};
const user = (state = initialState, action) => {
switch (action.type) {
case (type.LOGIN_USER):
return {
...state,
user: action.userData,
isLoggedIn: action.isLoggedIn
}
case (type.LOGOUT_USER):
return {
...state,
user: action.userData,
isLoggedIn: action.isLoggedIn
}
default:
return state
}
};
export default user;
|
store
1
2
3
4
5
| import { createStore, applyMiddleware } from 'redux';
import logger from 'redux-logger';
import reducers from '../reducers';
export default createStore(reducers, applyMiddleware(logger));
|
- 아래와 같이 콘솔 창에서 이전 값과 action 그리고 변화된 값까지 확인할 수 있다. 이렇게 변화된 값들을 확인할 수 있어, 디버깅하는데 큰 도움이 된다.
![]()
컴포넌트와 스토어 연결
1
2
3
4
5
6
7
8
9
10
11
12
13
14
| import reducer from '../reducers'; // reducer를 불러온다.
import { Provider } from 'react-redux'; //redux store와 react를 연결해준다.
import { createStore } from 'redux';
import App from './App';
const App = ({store}) => {
<Provider store={store}> // 자식컴포넌트들도 redux store state에 접근할 수 있다.
<App />
</Provider>
}
export default App;
const store = createStore(reducer, initialState)
|
Redux Persist를 사용하여 앱을 종료해도 지속되는 Store 만들기
redux는 상태 관리에 효율적이지만 리덕스 상태 앱을 종료하거나 브라우저를 새로 고침만 해도 저장되어 있던 모든 상태들이 없어진다. Redux Persist 라이브러리를 사용하면 마치 캐시 기능과 같이 상태 값을 지속적으로 저장한다.
1
| npm install redux-persist
|
1
2
3
4
5
6
7
8
9
10
11
12
13
14
| import { createStore, applyMiddleware } from 'redux';
import logger from 'redux-logger';
import { persistReducer } from 'redux-persist';
import storage from 'redux-persist/lib/storage';
import reducers from '../reducers';
const persistConfig = {
key: 'root',
storage
};
const enhancedReducer = persistReducer(persistConfig, reducers);**
export default createStore(enhancedReducer, applyMiddleware(logger));
|
1
2
3
4
5
6
7
8
9
10
11
12
13
14
15
16
17
18
19
| import React from 'react';
import ReactDOM from 'react-dom';
import { Provider } from 'react-redux';
import store from "./store/store";
import { persistStore } from 'redux-persist';
import { PersistGate } from 'redux-persist/integration/react';
import App from './App';
const persistor = persistStore(store);
ReactDOM.render(
<Provider store={store}>
<PersistGate loading={null} persistor={persistor}>
<App />
</PersistGate>
</Provider>,
document.querySelector('#root')
);
|

![]()
